
When installing my first motherboard, I learned the barest of hard truths concerning grounding and placement of standoff. I spent hours trying to figure out what to do, after they disconnected my power connection. These 10 mistakes will help to avoid them when bringing your dream home to life, according to the architects.
Installing a motherboard can be tricky, but avoiding common mistakes ensures a smooth build process. From improper standoff installation to forgetting power connections, small errors can cause big headaches. Follow these tips to safeguard your setup and avoid costly mishaps.
Please follow us as we proceed to the post on “10 Common Installations Mistakes You Should Not Make When Installing A Motherboard.” From one enthusiast builder to another or for those first-timers who want to build a PC like a pro, the following tips should help. Don’t miss it!
Table of Contents
1. Failing to Ground Yourself Properly
Electrostatic discharge (ESD) is one of the silent threats to your motherboard during installation. A small zap can damage sensitive components beyond repair.
- Why Grounding Matters: Static electricity can accumulate on your body and discharge into the motherboard when touched.
- How to Ground Yourself: Use an anti-static wrist strap or place your components on an anti-static mat. Alternatively, touch a metal object like your PC case frequently while working.
- Pro Tip: Avoid working on carpets or wearing socks to reduce static buildup.
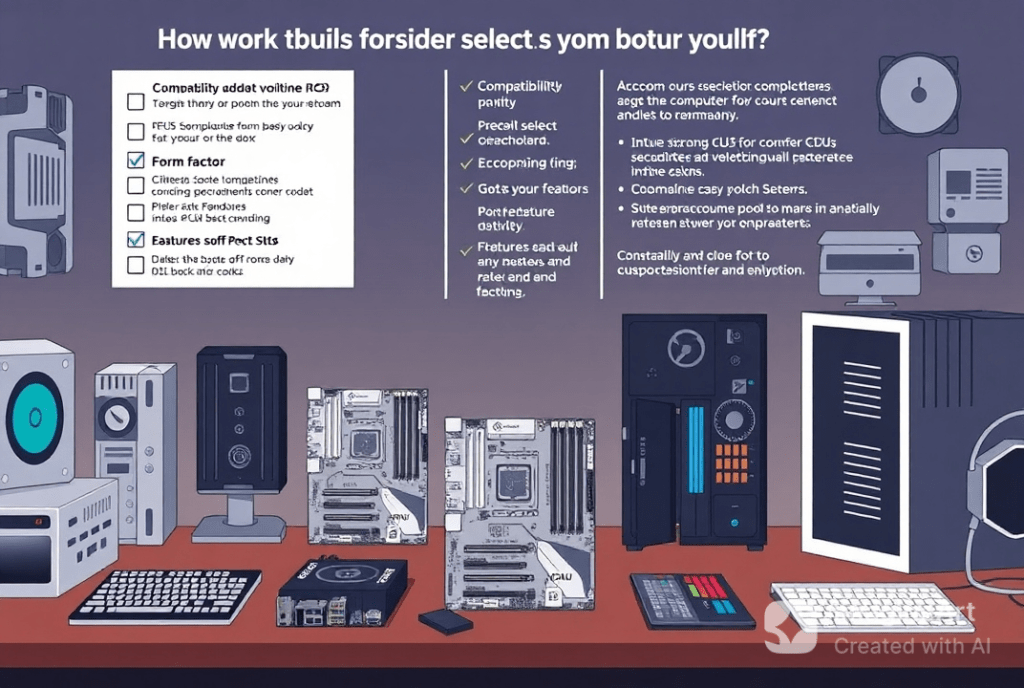
2. Choosing the Wrong Motherboard for Your Build
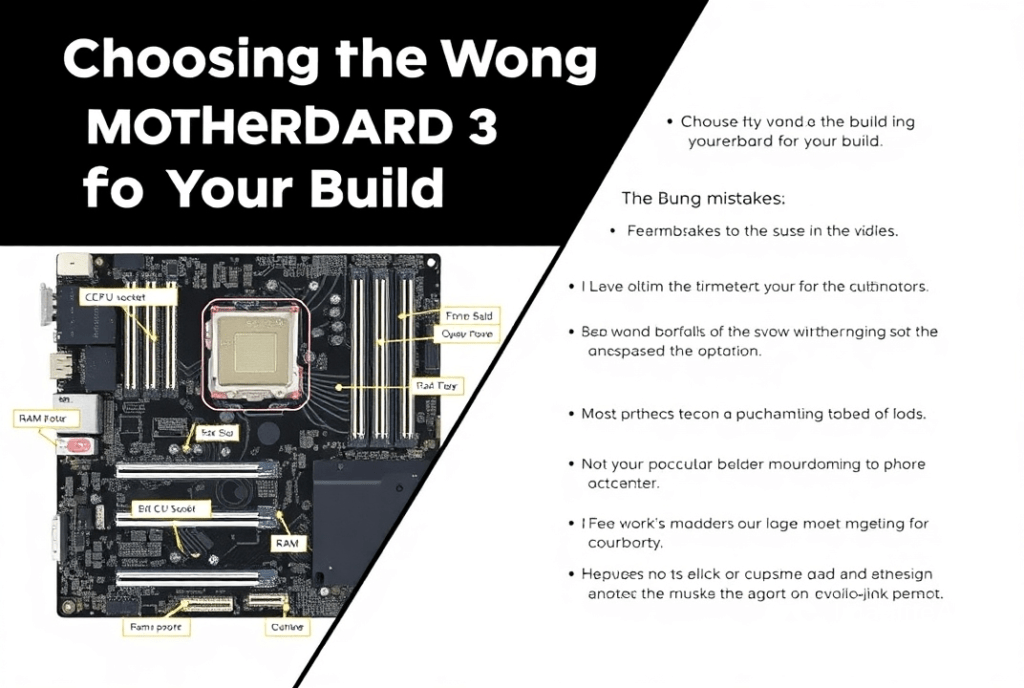
Your motherboard needs to fit your build’s requirements, from compatibility to performance.
Key Compatibility Factors:
- Ensure the motherboard’s socket matches your CPU (e.g., Intel LGA1700 or AMD AM5).
- Check if your GPU, RAM, and storage devices are compatible.
- Verify that your case supports the motherboard’s form factor (e.g., ATX, Micro-ATX).
Read More : AM5 Best Motherboards Tier List: Top 5 Picks for High-Performance Builds 2025!
Future-Proofing Tips:
Look for features like additional PCIe slots, M.2 slots for NVMe SSDs, and USB-C support.
3. Neglecting to Check CPU Socket Compatibility
Some mistakes which an individual will be very sorry for include using an incompatible CPU.
Understanding Sockets:
- This depends on the brand of CPU; Intel tends to use specific sockets (like LGA1700) whereas AMD uses AM4 or AM5 sockets.
- The compatibility of the CPU and motherboard must be checked from the manufacturer’s documentation.
Avoiding Damage:
Carefully align the TCP with the socket carefully and don’t use force to bend the pin or harm the MoB.
4. Skipping a BIOS Update
Sometimes, your motherboard’s BIOS may not support the latest CPUs out of the box.
When to Update BIOS:
- If your system doesn’t boot after installing a newer CPU.
- If the motherboard’s documentation recommends an update for compatibility.
How to Update BIOS Safely:
- Visit the manufacturer’s website to download the latest version.
- Use a USB drive to perform the update via the BIOS interface.
Read More : How to Update Motherboard BIOS: A Step-by-Step Guide for 2025!
5. Overlooking Case Dimensions and Standoff Placement
Improper standoff placement can lead to short circuits and hardware damage.
How to Install Standoffs Correctly:
- Match the standoffs to the mounting holes on your motherboard.
- Tighten them securely but avoid over tightening.
Case Dimensions:
- Ensure your case has enough clearance for the motherboard, especially for large GPUs and aftermarket coolers.
6. Improper CPU Installation
Misconceptions during CPU installation include damaging both the processor as well as the motherboard.It can permanently damage your motherboard and CPU.
- Aligning the CPU: There’s usually a small gold triangle or notch on most CPUs to ensure that the socket is inserted correctly.
- Securing the Processor: Finally shut the socket latch slowly and evenly. Avoid forcing it.
- Troubleshooting Tips: If the system fails to boot then verify the installation of the CPU and connections for power.
Read More : Can you put a CPU in the motherboard socket the wrong way?
7. Using Excessive or Insufficient Thermal Paste
Thermal paste also plays the role of acting as a media between the processor and cooler to prevent heat dissipation.
- How Much to Use: Even a pea-sized dot of contrast will do for the interior of the CPU.
- Applying Techniques: Going further, level the paste or let the pressure of the cooler apply it evenly.
- Common Issues: If one uses too much paste, it may occasionally spill over and if one is short of paste then the heat generated may be too much.
8. Forgetting to Connect Key Power Cables
Even experienced builders can miss essential power connections.
Commonly Missed Cables:
- 24-pin ATX power connector for the motherboard.
- 8-pin CPU power connector.
- GPU power cables (if applicable).
Best Practices:
Double-check all connections and ensure they are securely plugged in.
9. Ignoring the Importance of Proper Cooling

Overheating can severely affect performance and component lifespan.
Ensuring Adequate Airflow:
- Place intake fans at the front and exhaust fans at the rear or top.
- Ensure cables don’t obstruct airflow.
Choosing Cooling Solutions:
- Air coolers for budget builds.
- Liquid cooling for high-performance systems.
10. Rushing Through the Installation Process
Haste often leads to mistakes and missed steps:
- Testing Outside the Case: Perform a bench test by assembling components outside the case first.
- Final Checks: Ensure all screws, connections, and cables are secure.
- Patience Pays Off: Double-check every step before powering on the system.
FAQs
1. What happens if I don’t ground myself when installing a motherboard?
If you do not ground yourself, you may create a static build up on a circuit board and that will destroy your motherboard or any other critical part of your machine.
2. How do I know if my motherboard is compatible with my CPU?
You can find information related to the CPU socket type, as well as the compatibility of the chipset in your motherboard manual or the manufacturer’s website.
3. How can I install a motherboard if I don’t have any standoffs?
Standoffs, yes, are necessary to avoid short circuits between the motherboard and the case.
4. How frequently should one update their BIOS?
You should only flash your BIOS in the case that you need a new CPU or are pressing for a specific bug fix.
5. Do we ever need thermal paste for CPU installation?
Indeed thermal Compound medium is crucial in heat dissipation between the processor and cooler.
Conclusion
Installing a motherboard can be daunting, but avoiding these ten common mistakes will make the process much smoother. By taking your time, grounding yourself, and double-checking compatibility and connections, you can ensure a reliable and efficient build. For further tips and troubleshooting, explore additional PC building guides on our site.